To avoid potential risks, we do not recommend uninstalling and reinstalling Cobo Guard on your device. If you mistakenly do so, you must also reset Cobo Guard. In this scenario, both “old device” and “new device” in this documentation refer to the same device.
For Cobo Guard users who are key share holders
Reset decision guide for key share holders
If your Cobo Guard serves as a key share holder and participates in MPC Wallet key management, please refer to the decision diagram below before resetting.Note: This diagram does not represent the actual UI flow. The UI will guide you based on the device and backup information you select, and show only the steps that apply to your situation (see the next section Steps to reset Cobo Guard for key share holders). However, it may not cover certain edge cases. This diagram provides a complete overview of all possible key share recovery paths for your reference.

Steps to reset Cobo Guard for key share holders
- Download Cobo Guard on your new device.
-
On the web, go to the MFA Management section of Cobo Accounts and click Complete on the Cobo Guard reset notice.

-
You will be guided through a series of selections about your device and key share backup (starting with the first screen shown below), and the system will then present the actions that apply to your situation.
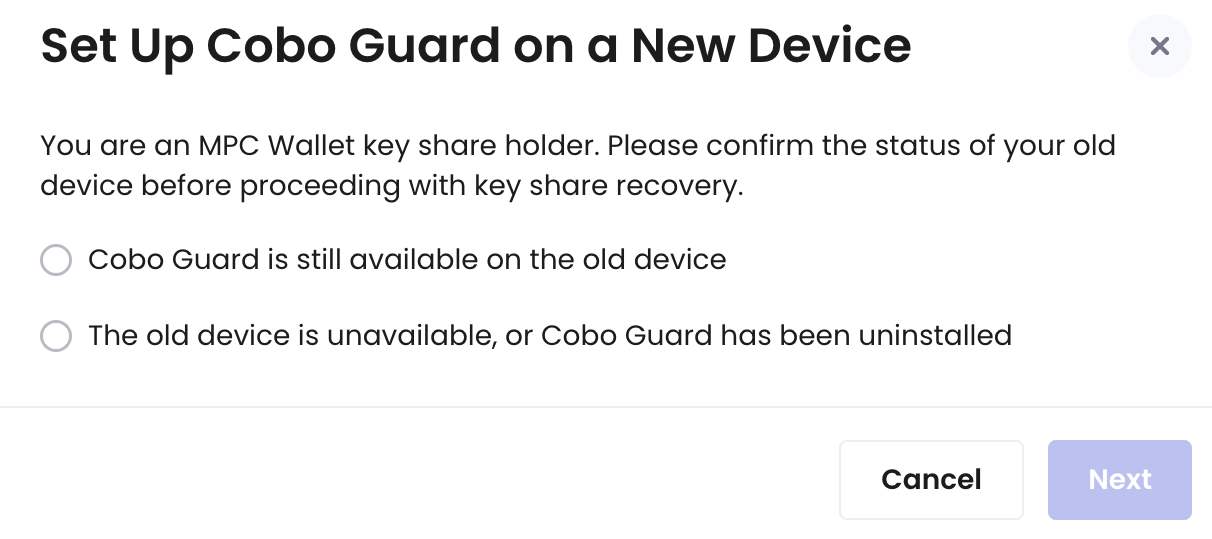
- Scenario 1: Old device available: Cobo Guard is still accessible on your old device.
- Scenario 2: Old device unavailable + backup available: Your old device is lost or Cobo Guard has been uninstalled, but the key share was previously backed up and you remember the iCloud account and recovery passphrase.
- Scenario 3: Old device unavailable + no valid backup: Your old device is lost or Cobo Guard has been uninstalled, and you either never created a backup or no longer remember the iCloud account or recovery passphrase for the backup.
Scenario 1: Old device available
If Cobo Guard is still available on your old device, you will be prompted to complete the following items.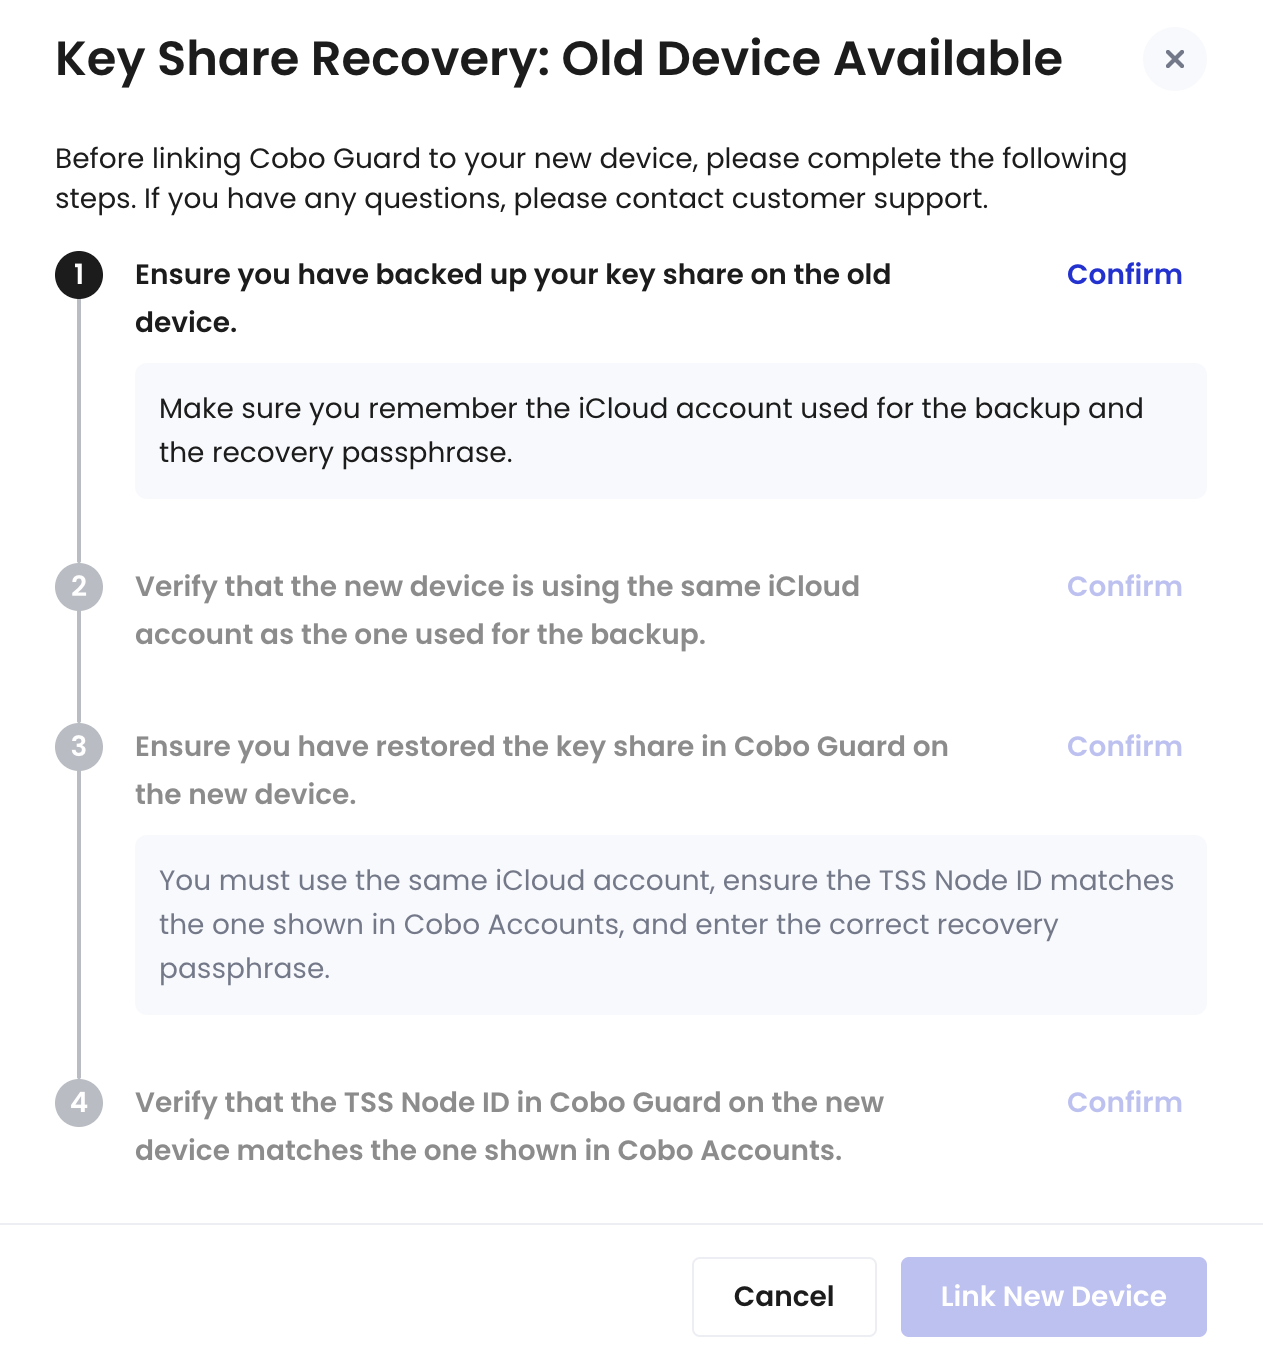
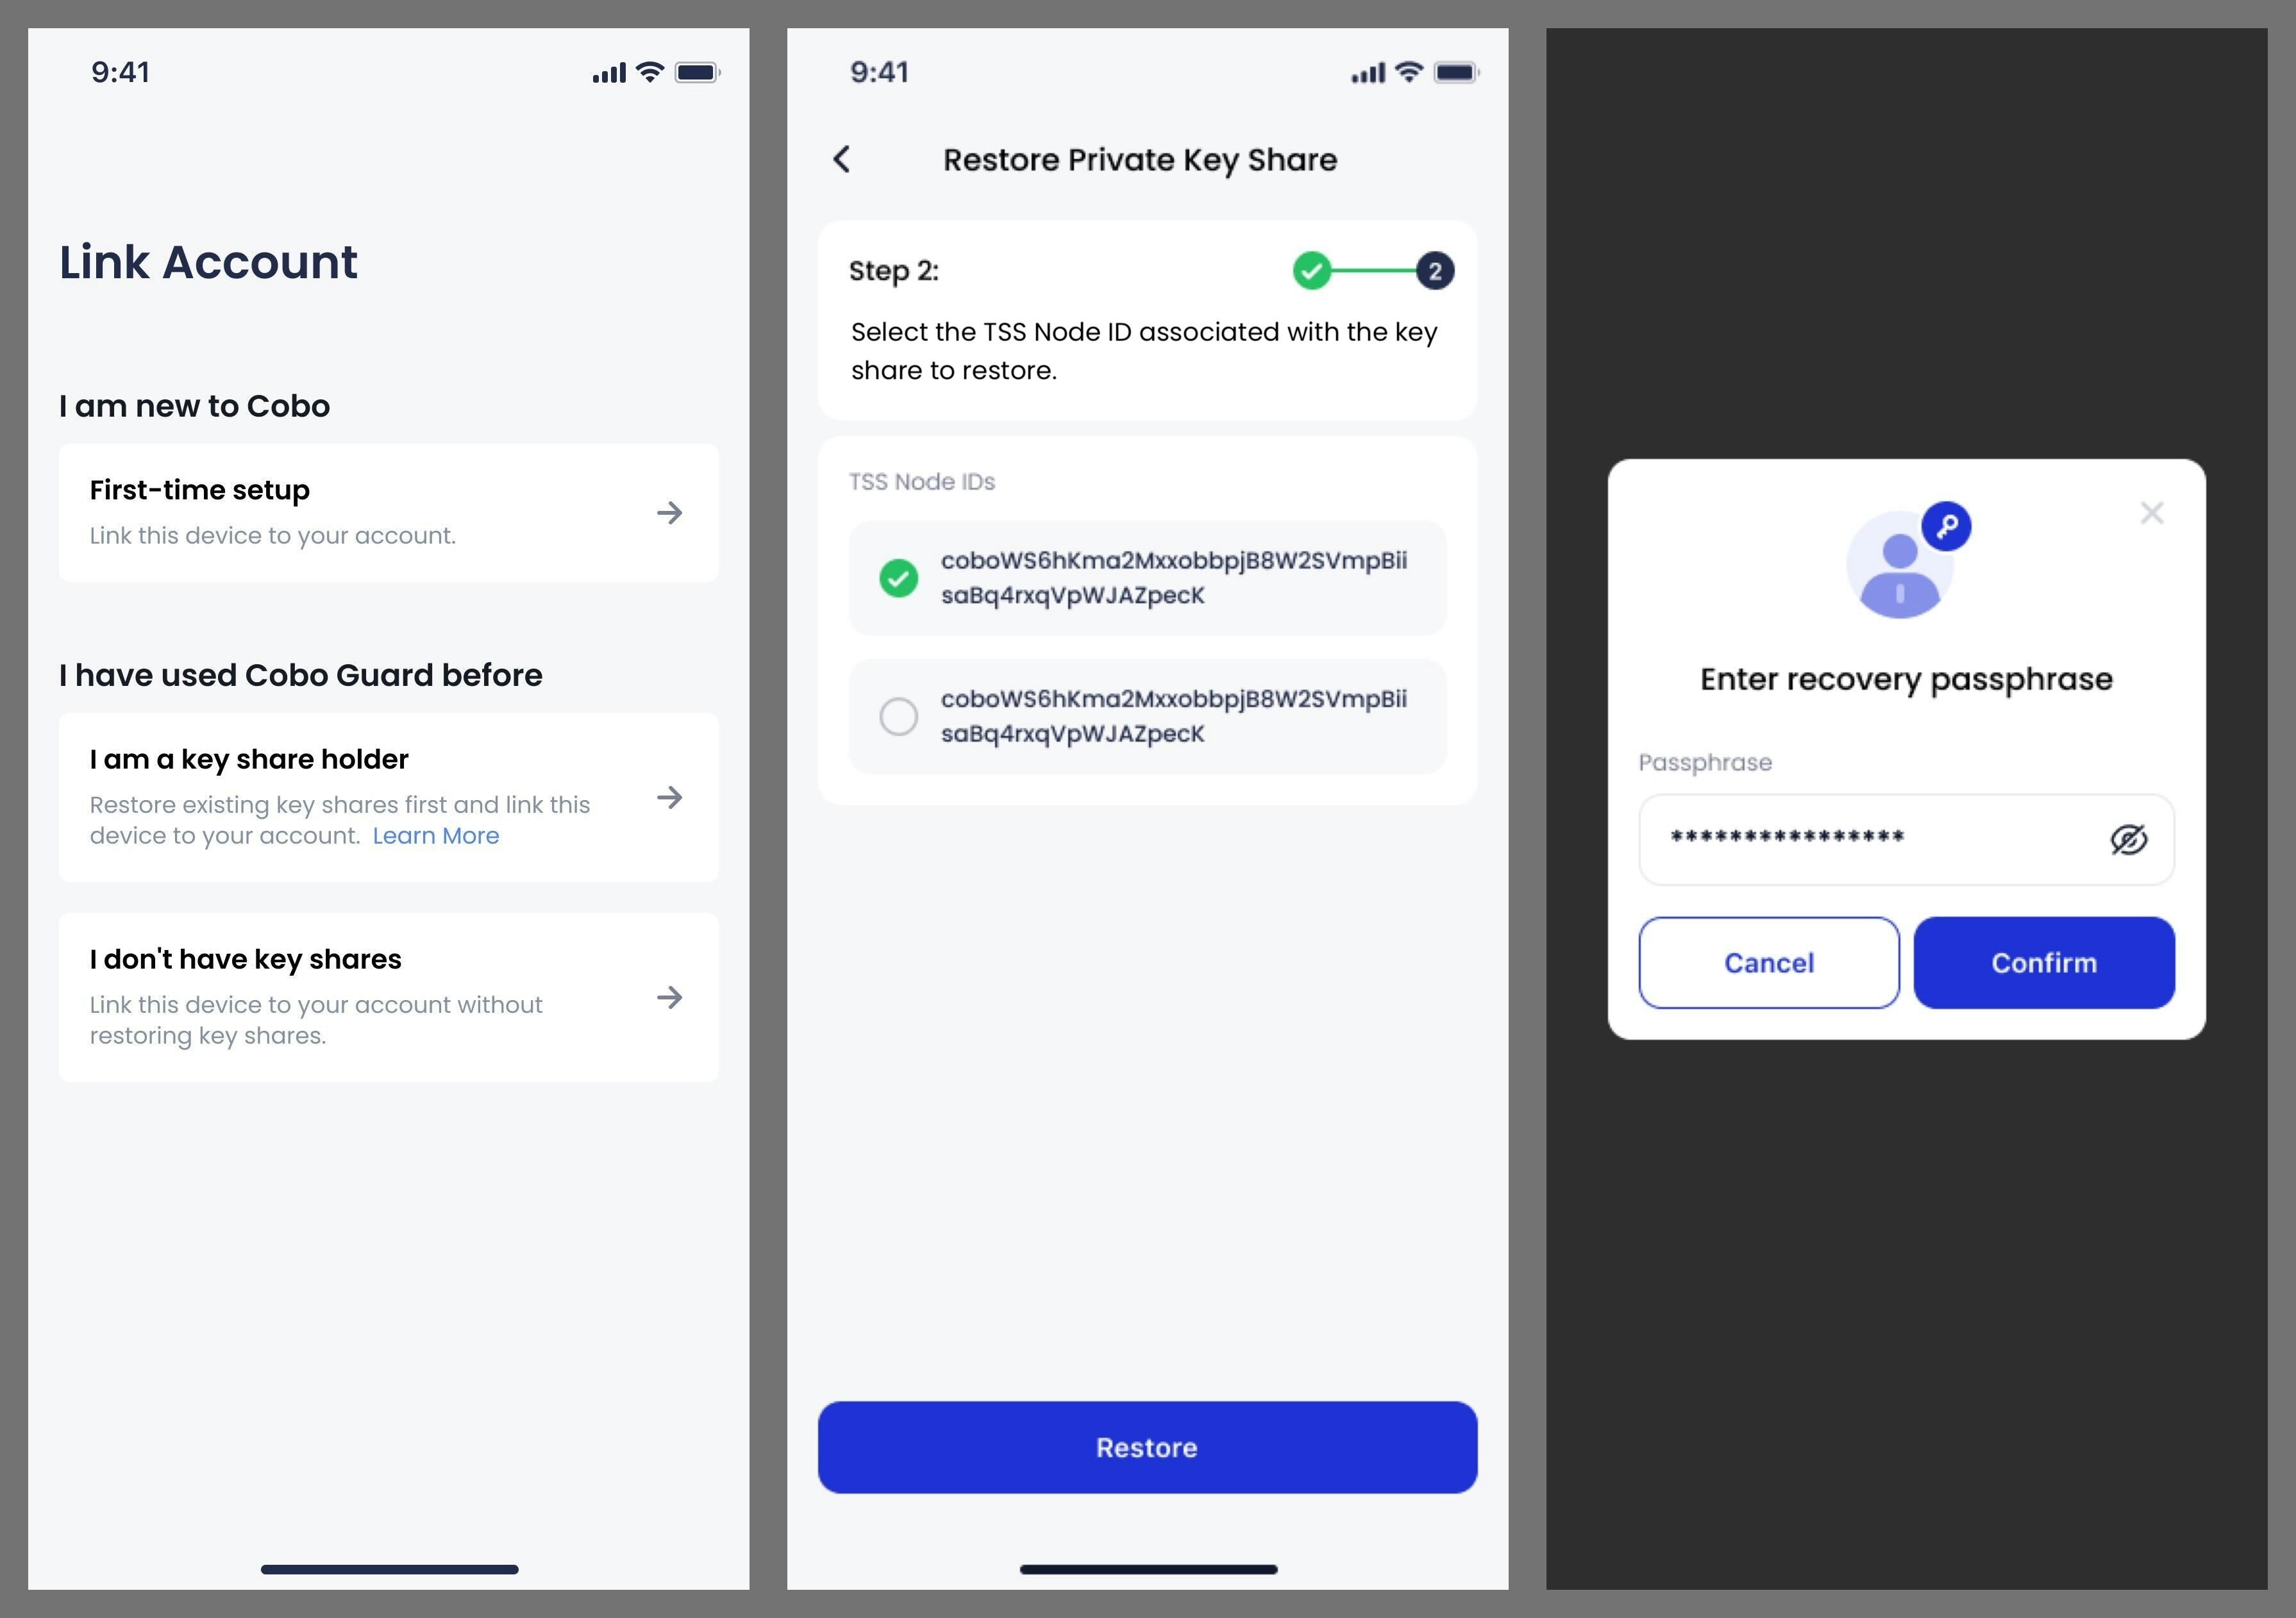
- Open Cobo Guard on your new device and select I am a key share holder. Cobo Guard will begin checking your key share files.
- Select the TSS Node ID associated with the key share you wish to restore, then tap Restore.
- Enter the recovery passphrase you previously set when creating the backup, then tap Confirm.
-
Once restored, Cobo Guard will display Key share successfully restored. You can go to
→ My Public Key to verify your TSS Node ID is the same as the one shown in Cobo Accounts.
-
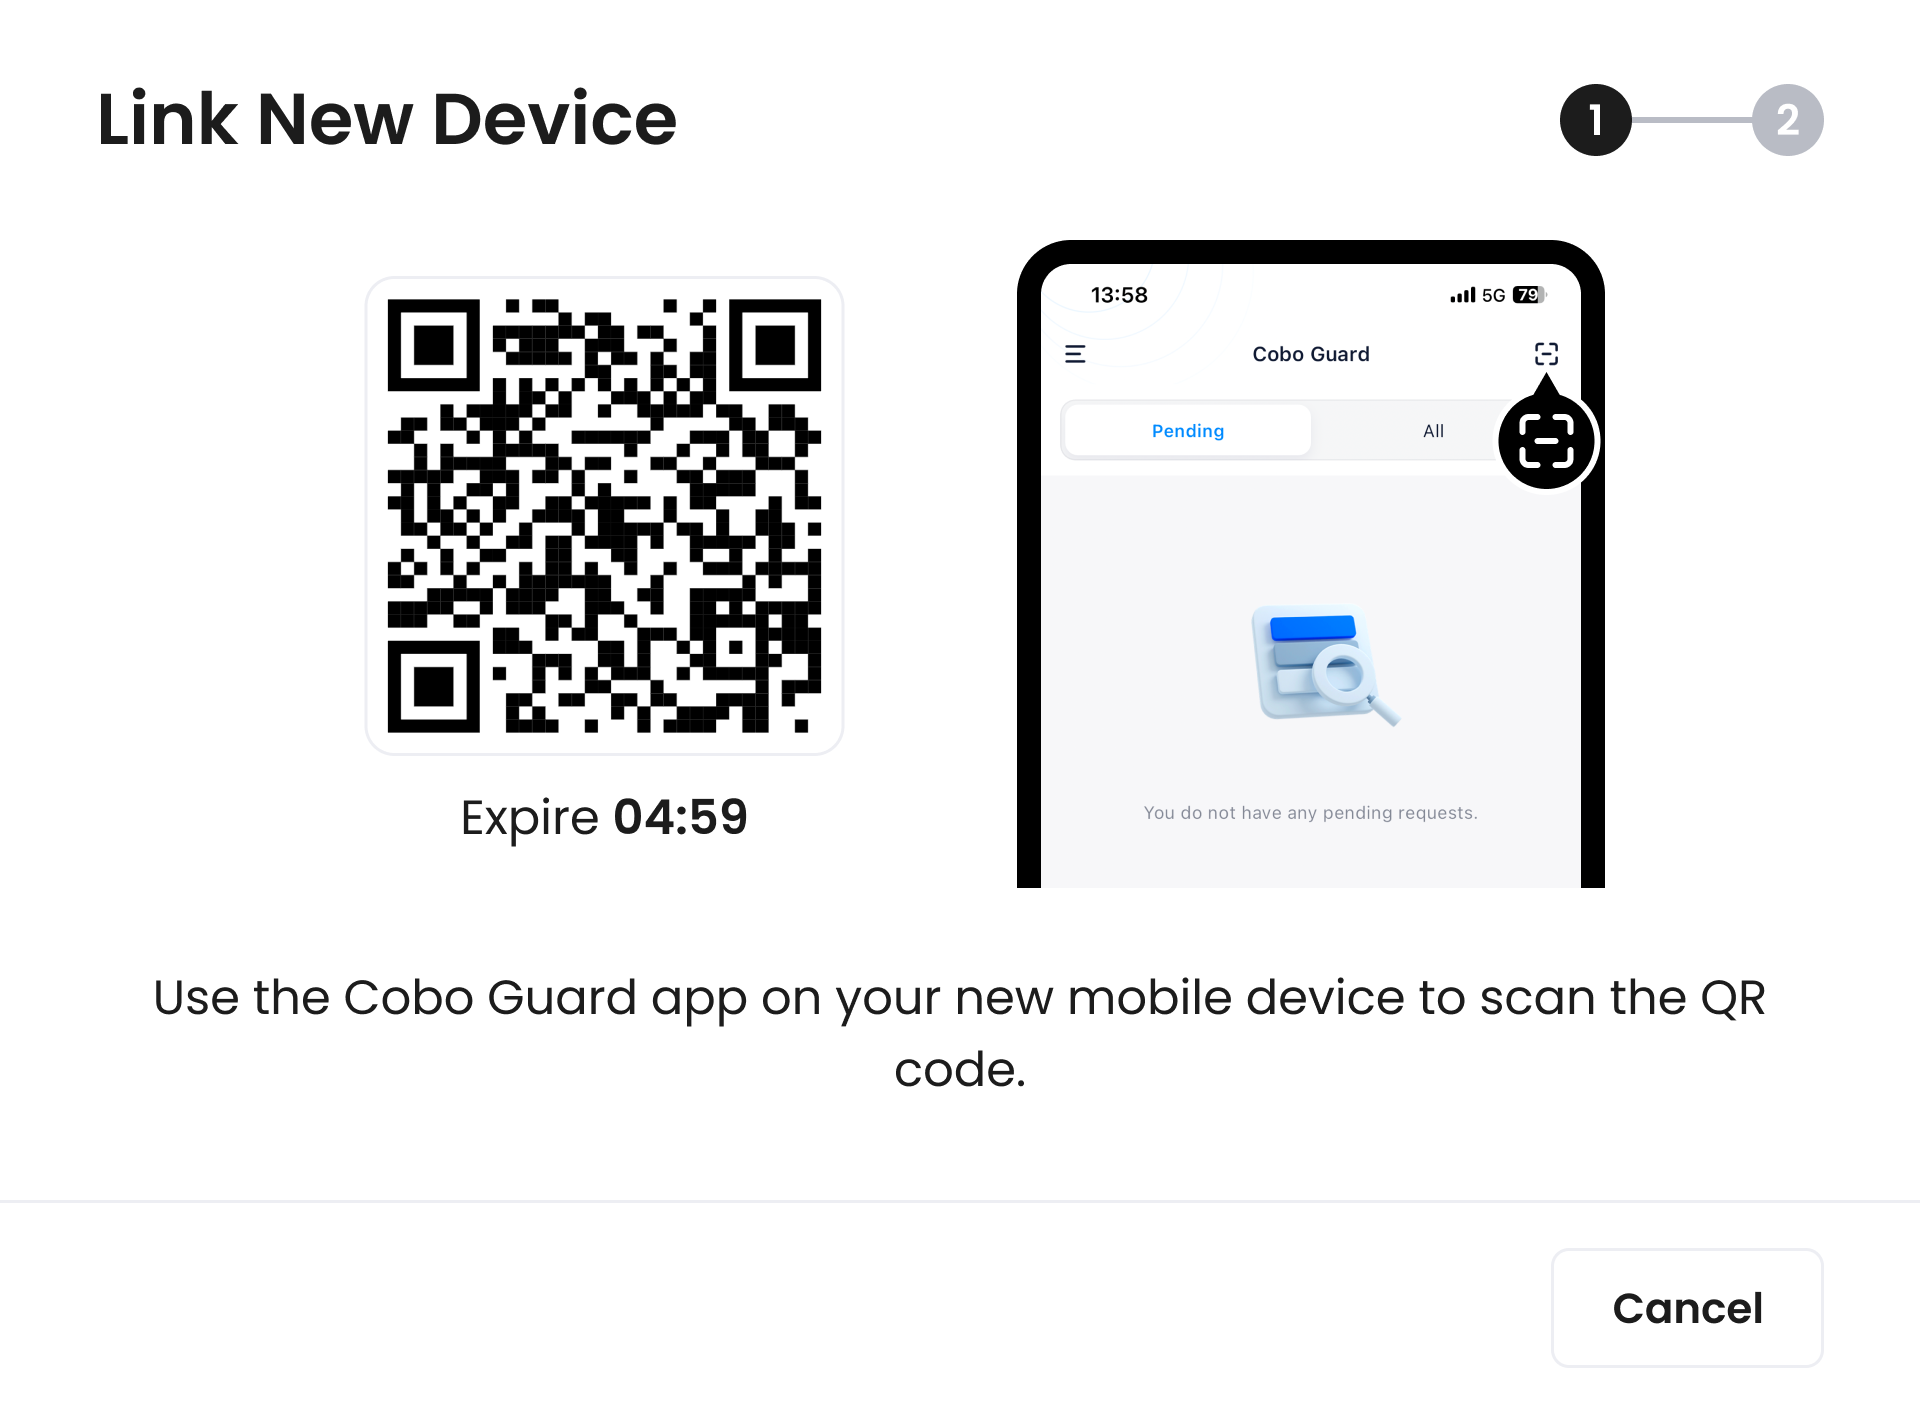
Use Cobo Guard on your new device to scan the QR code that’s displayed in the dialog on the Cobo Accounts page.
-
With your account successfully linked, the Cobo Accounts page will display a Security Verification dialog.
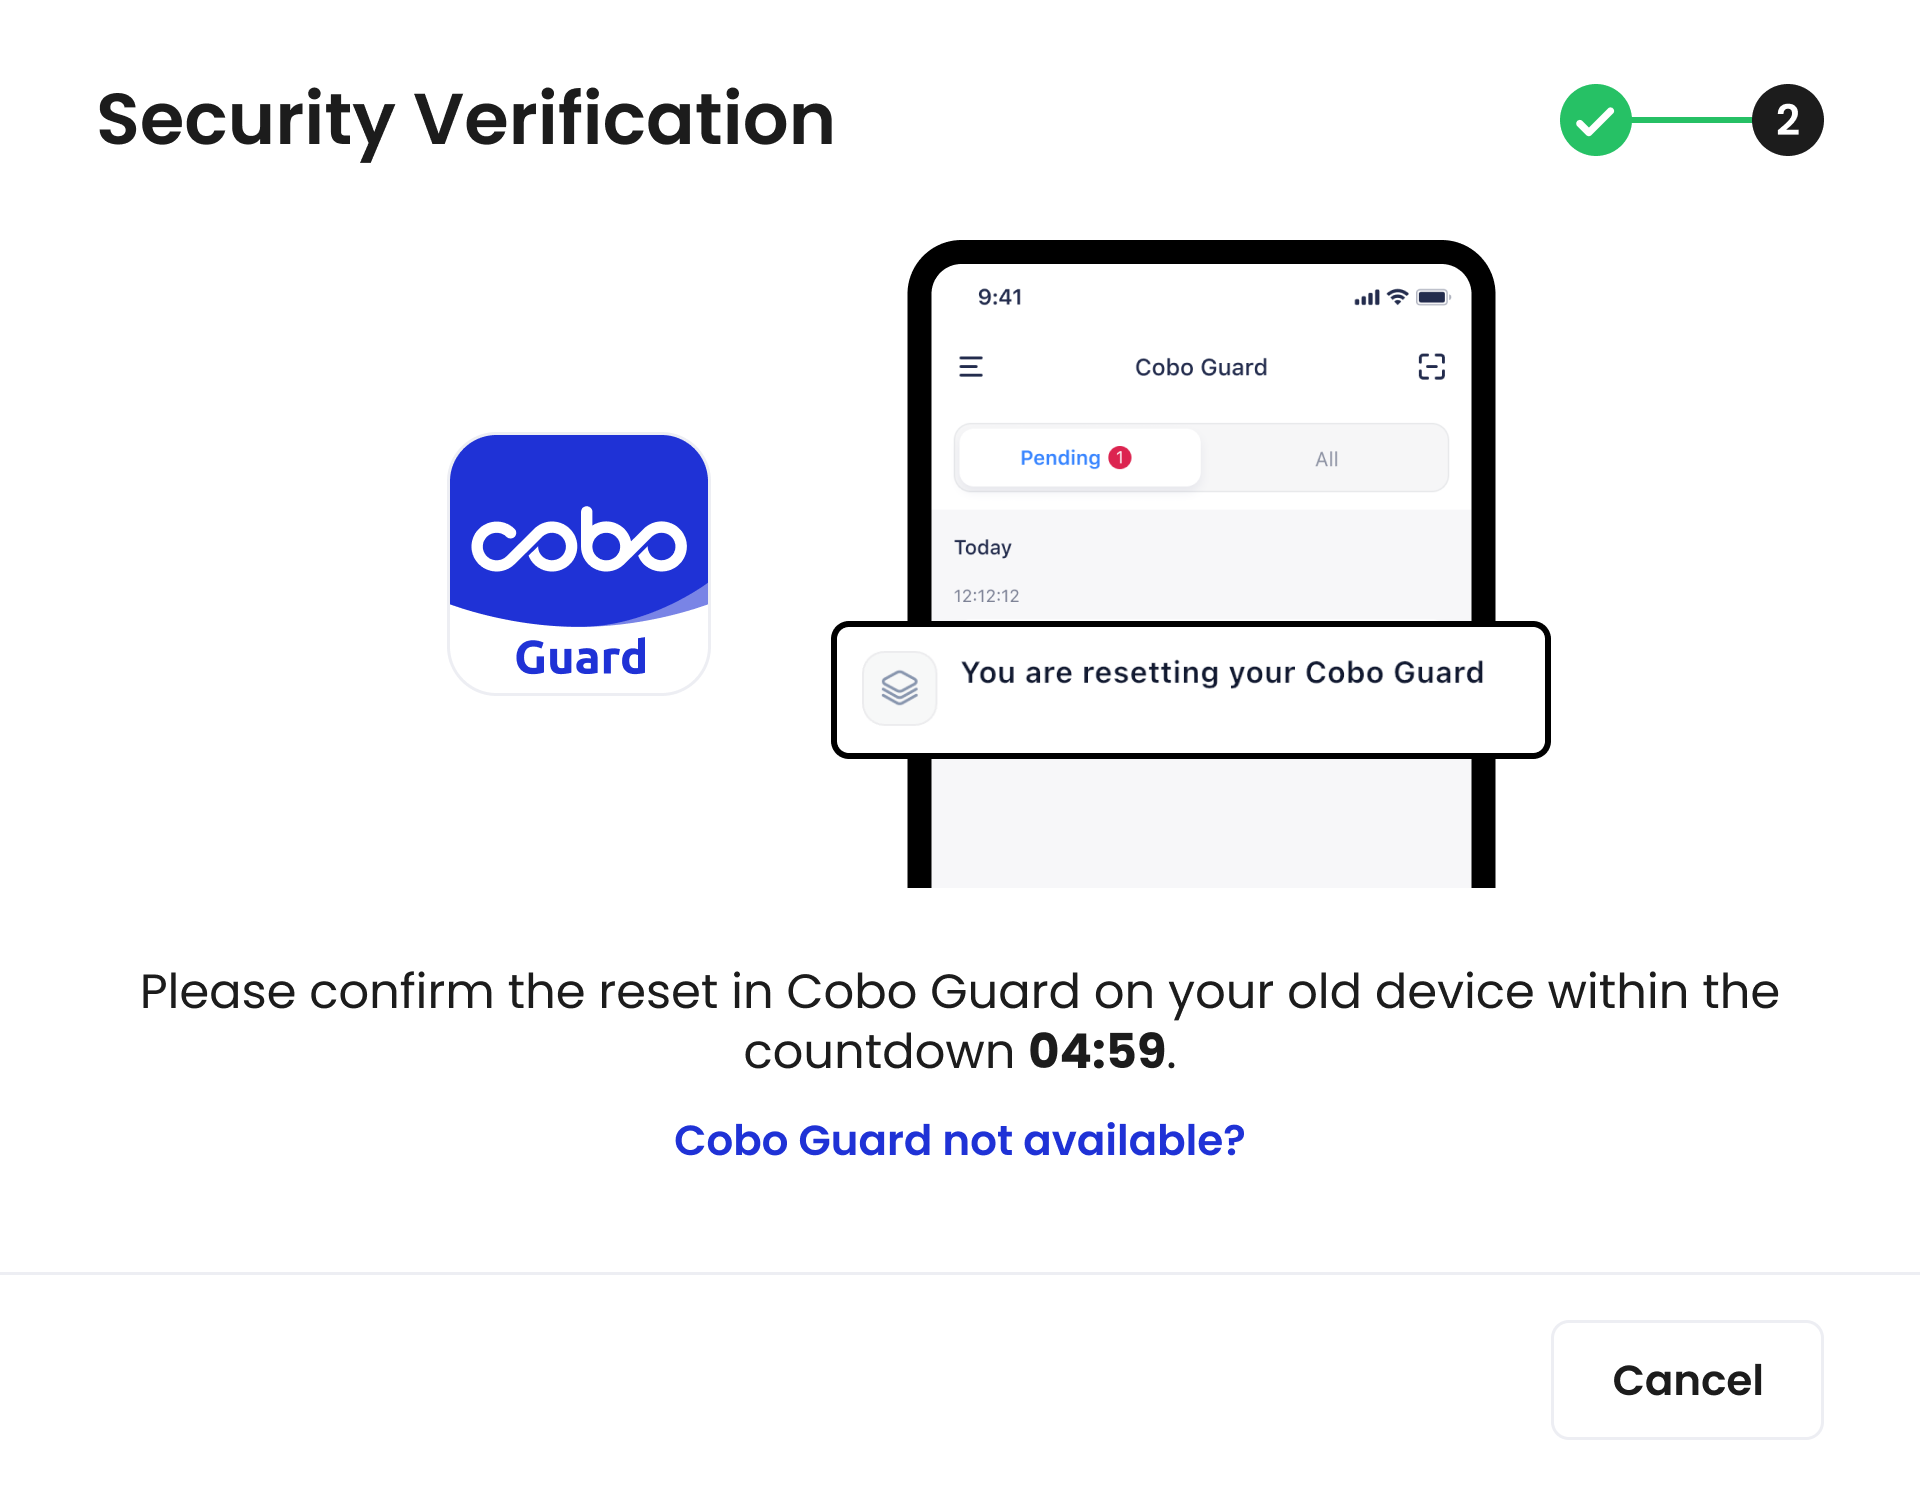
- On your old device, open Cobo Guard and tap Approve.
-
With successful authentication, you will be redirected to the MFA Management tab. In the Cobo Guard on your new device, tap
and then My Accounts, you will see the email to which your Cobo Accounts is linked. That means your Cobo Guard has been successfully linked to Cobo Accounts.
Scenario 2: Old device unavailable + backup available
If Cobo Guard on your old device is unavailable, but a valid backup exists and you remember the iCloud account and recovery passphrase, you will be prompted to complete the following items: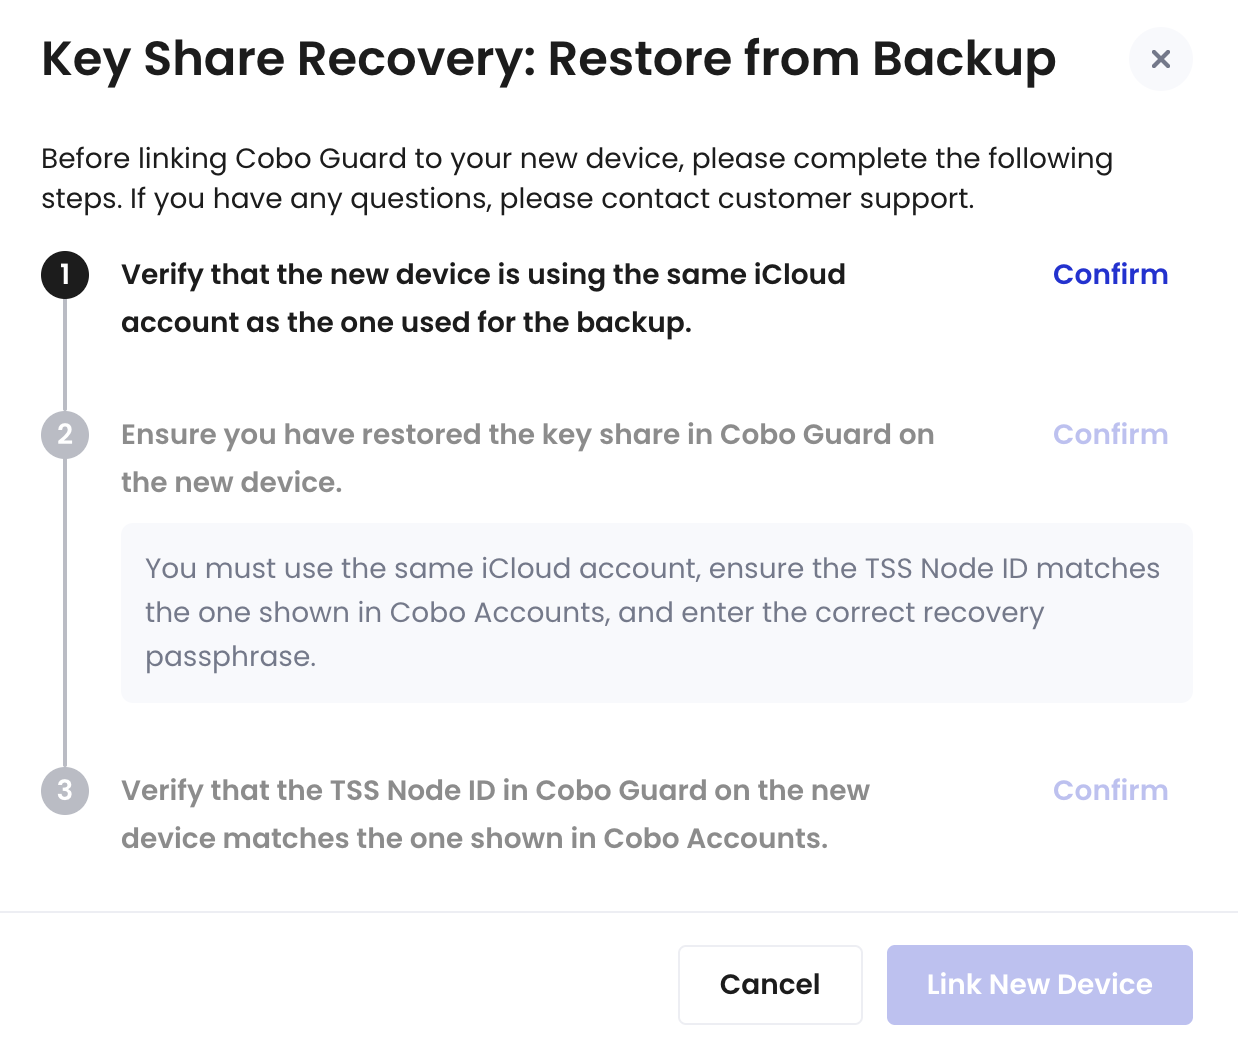

- Open Cobo Guard on your new device and select I am a key share holder. Cobo Guard will begin checking your key share files.
- Select the TSS Node ID associated with the key share you want to restore (make sure it’s the same as the TSS Node ID shown in your Cobo Accounts), then tap Restore.
- Enter the recovery passphrase you previously set when creating the backup, then tap Confirm.
-
Once restored, Cobo Guard will display Key share successfully restored. You can go to
→ My Public Key to verify your TSS Node ID is the same as the one shown in Cobo Accounts.
-
Use Cobo Guard on your new device to scan the QR code that’s displayed in the dialog on the Cobo Accounts page.

-
With your account successfully linked, the Cobo Accounts page will display a Security Verification dialog. Click Cobo Guard not available?, and use another MFA method for authentication.
If you have not set up any other MFA method, please contact support.

-
With successful authentication, you will be redirected to the MFA Management tab. In the Cobo Guard on your new device, tap
and then My Accounts, you will see the email to which your Cobo Accounts is linked. That means your Cobo Guard has been successfully linked to Cobo Accounts.
As you used another MFA method instead of Cobo Guard for the authentication in the previous step, your Cobo Accounts will be temporarily frozen. An Admin from your organization will need to unfreeze it. If you are the only member of your organization, the whole organization will be frozen for 24 hours. You can log in to the Cobo Portal after this period.
Scenario 3: Old device unavailable + no valid backup
The system will prompt you to contact support for manual assistance.For Cobo Guard users who haven’t created key shares
-
Go to the MFA Management section of Cobo Accounts and click Reset next to Cobo Guard to start the reset flow, which will guide you to the Link New Device dialog.

- Download Cobo Guard on your new device.
- Open Cobo Guard on your new device, select I don’t have key shares, and scan the QR code that’s displayed in the dialog on the Cobo Accounts page.
-
With your account successfully linked, the Cobo Accounts page will display a Security Verification dialog.

-
If you can access your old device, open Cobo Guard on it and choose Approve. Otherwise, click Cobo Guard not available?, and use another MFA method for authentication.
If you have not set up any other MFA method, please contact support.
-
With successful authentication, you will be redirected to the MFA Management tab. In the Cobo Guard on your new device, tap
and then My Accounts, you will see the email to which your Cobo Accounts is linked. That means your Cobo Guard has been successfully linked to Cobo Accounts.
If you use another MFA method instead of Cobo Guard for the authentication in the previous step, your Cobo Accounts will be temporarily frozen. An Admin from your organization will need to unfreeze it. If you are the only member of your organization, the whole organization will be frozen for 24 hours. You can log in to the Cobo Portal after this period.
